按照Bean的配置方式手动创建可以分为两种:
使用XMl配置的Bean
这种方式使用xml配置文件配置Bean的信息并且设置扫描的路径,扫描到的包可以使用注解进行配置Bean信息,一般来说手动创建BeanFactory容器的实现类为ClassPathXmlApplicationContext 和SystemFileXmlApplicationContext,设置xml的路径即可创建出IOC容器。
例如:
ClassPathXmlApplicationContext context = new ClassPathXmlApplicationContext("classpath:spring-test.xml"); User user = context.getBean(User.class);使用注解配置的Bean
这种方式不使用xml配置文件,全部基于注解方式配置Bean的信息,比如使用@Component、@Configuration进行Bean的配置,实现类为AnnotationConfigApplicationContext 设置扫描的包,然后调用refresh方法进行IOC容器的创建。
例如:
AnnotationConfigApplicationContext context = new AnnotationConfigApplicationContext(); context.scan("com.redwinter.test"); context.refresh();但是一般来说开发中都是使用web容器进行IOC容器的创建的,比如tomcat容器、jetty容器、undertow容器、netty容器,在Spring中有一个BeanFactory的实现类:GenericApplicationContext,他的子类有一个叫GenericWebApplicationContext,在Spring Boot中,就是通过实现这个类完成Web容器的创建+IOC容器的创建的。在Spring Boot中有个类叫ServletWebServerApplicationContext就是继承了GenericWebApplicationContext这个类,然后ServletWebServerApplicationContext中有个属性叫webServer,这个是一个接口,这个接口对应的实现就是Web容器的实现:
public class ServletWebServerApplicationContext extends GenericWebApplicationContext implements ConfigurableWebServerApplicationContext { public static final String DISPATCHER_SERVLET_NAME = "dispatcherServlet"; // web 容器,实现类有TomcatWebServer、JettyWebServer、NettyWebServer、UndertowWebServer private volatile WebServer webServer; // .... 去掉其他代码 }本文介绍使用XML配置文件手动创建IOC容器的方式
根据上一篇文章https://www.cnblogs.com/redwinter/p/16151489.htmlSpring Bean IOC 的创建流程种的第一个方法AbstractApplicationContext#prepareRefresh前戏准备工作继续解读AbstractApplicationContext#refresh方法中的第二方法AbstractApplicationContext#obtainFreshBeanFactory获取BeanFactory,这个方法会创建一个DefaultListableBeanFactory 默认的可列出Bean的工厂。
AbstractApplicationContext#obtainFreshBeanFactory中主要是刷新BeanFactory,源码如下:
@Override protected final void refreshBeanFactory() throws BeansException { // 如果有BeanFactory 就销毁掉并关闭 if (hasBeanFactory()) { destroyBeans(); closeBeanFactory(); } try { // 直接new一个BeanFactory 实现出来 DefaultListableBeanFactory DefaultListableBeanFactory beanFactory = createBeanFactory(); // 根据上一步创建BeanFactory创建的Id进行获取 beanFactory.setSerializationId(getId()); // 定制化BanFactory ,比如设置allowBeanDefinitionOverriding 和allowCircularReferences 的属性 customizeBeanFactory(beanFactory); // 加载BeanDefinitions 从xml 和注解定义的Bean // 从configLocations -> String[] -> String -> Resource[] -> Resource -> InputStream -> Document -> 解析成一个一个的BeanDefinition 对象 loadBeanDefinitions(beanFactory); this.beanFactory = beanFactory; } catch (IOException ex) { throw new ApplicationContextException("I/O error parsing bean definition source for " + getDisplayName(), ex); } }BeanFactory了,如果有就销毁掉并且关闭工厂BeanFactory,默认就是使用new DefaultListableBeanFactory,不过在创建的过程中可能会默认初始化一些属性,比如:allowBeanDefinitionOverriding 和allowCircularReferences 允许Bean覆盖和解决循环依赖的问题,还有就是BeanFactory的序列化id等属性。idBeanFactory,这里是一个扩展点,你可以对BeanFactory进行定制BeanDefinition,这里从XML配置文件中去加载,这里面的逻辑非常的复杂繁琐BeanFactory设置出去在customizeBeanFactory(beanFactory);这个方法中,spring设置了两个属性,一个是设置是否可以覆盖Bean,一个是否允许循环依赖,源码如下:
protected void customizeBeanFactory(DefaultListableBeanFactory beanFactory) { // 可以定制设置是否允许Bean覆盖 if (this.allowBeanDefinitionOverriding != null) { beanFactory.setAllowBeanDefinitionOverriding(this.allowBeanDefinitionOverriding); } // 可以定制设置是否允许循环依赖 if (this.allowCircularReferences != null) { beanFactory.setAllowCircularReferences(this.allowCircularReferences); } }spring提供了这个扩展点,那么我们就可以定制BeanFactory,比如我们新建一个类继承ClassPathXmlApplicationContext,然后重写customizeBeanFactory这个方法:
/** * @author <a href="https://www.cnblogs.com/redwinter/">redwinter</a> * @since 1.0 **/ public class MyClassPathXmlApplicationContext extends ClassPathXmlApplicationContext { public MyClassPathXmlApplicationContext(String... configLocation) throws BeansException { super(configLocation); } @Override protected void customizeBeanFactory(DefaultListableBeanFactory beanFactory) { // 扩展点 设置不去处理循环依赖或者beanDefinition覆盖 super.setAllowBeanDefinitionOverriding(true); // 设置不允许循环依赖 super.setAllowCircularReferences(false); // 调用父类的方法 super.customizeBeanFactory(beanFactory); } }创建两个类,并且设置为循环依赖:
/** * @author <a href="https://www.cnblogs.com/redwinter/">redwinter</a> * @since 1.0 **/ @Service public class PersonService { @Autowired private UserService userService; public void test() { System.out.println(userService); } } /** * @author <a href="https://www.cnblogs.com/redwinter/">redwinter</a> * @since 1.0 **/ @Service public class UserService { @Autowired private PersonService personService; public void test(){ System.out.println(personService); } }创建之后然后使用自定义的MyClassPathXmlApplicationContext类进行启动:
/** * @author <a href="https://www.cnblogs.com/redwinter/">redwinter</a> * @since 1.0 **/ public class BeanCreate { @Test public void classPathXml() { // ClassPathXmlApplicationContext context = new ClassPathXmlApplicationContext("classpath:spring-test.xml"); ClassPathXmlApplicationContext context = new MyClassPathXmlApplicationContext("classpath:spring-test.xml"); UserService userService = context.getBean(UserService.class); userService.test(); } }启动之后发现报错了:
四月 19, 2022 1:26:55 下午 org.springframework.context.support.AbstractApplicationContext refresh 警告: Exception encountered during context initialization - cancelling refresh attempt: org.springframework.beans.factory.UnsatisfiedDependencyException: Error creating bean with name 'personService': Unsatisfied dependency expressed through field 'userService'; nested exception is org.springframework.beans.factory.UnsatisfiedDependencyException: Error creating bean with name 'userService': Unsatisfied dependency expressed through field 'personService'; nested exception is org.springframework.beans.factory.BeanCurrentlyInCreationException: Error creating bean with name 'personService': Requested bean is currently in creation: Is there an unresolvable circular reference?如果设置为true,那么启动不会报错了并且输出了:
com.redwinter.test.service.PersonService@6fc6f14e在刷新BeanFactory的方法中,有个方法叫loadBeanDefinitions,这个方法就是进行BeanDefinition的加载的,他的大致流程是这样的:
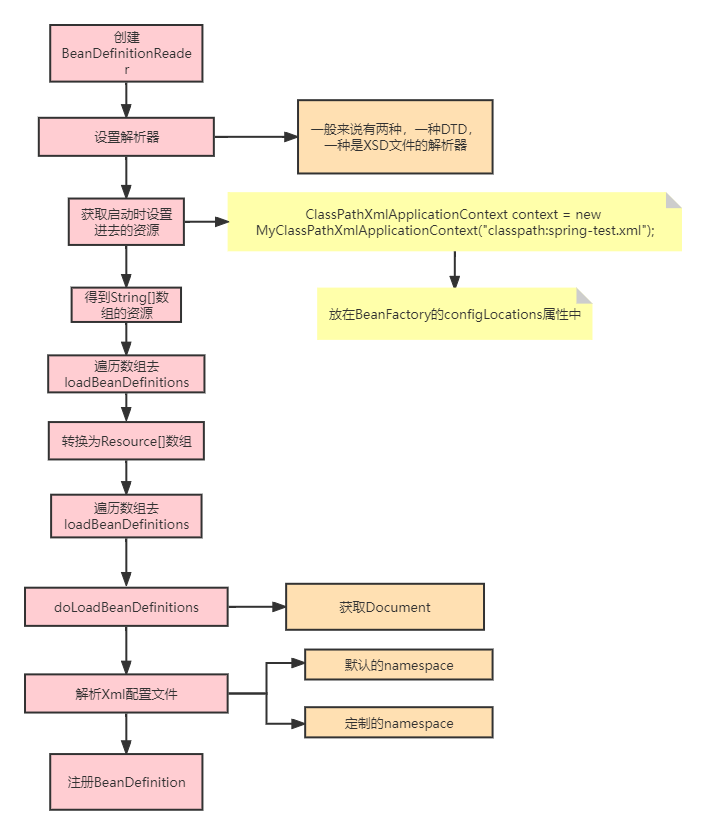
在BeanDefinition加载的过程中,有个关键点可以让我们自定义标签进行BeanDefinition的加载和解析,在设置解析器的时候,Spring是这样设置解析器的:
public DelegatingEntityResolver(@Nullable ClassLoader classLoader) { // 创建dtd解析器 this.dtdResolver = new BeansDtdResolver(); // 创建schema 解析器 // 在Debug的时候,这里会调用toString方法,然后去调用getSchemaMappings 方法,将schemaMappings 设置属性进去 this.schemaResolver = new PluggableSchemaResolver(classLoader); }在Spring中一般解析XML文件的时候都是从网上下载对应的标签解析,比如Spring配置文件中的https://www.springframework.org/schema/beans/spring-beans-3.1.xsd ,但是一般来说都是不需要进行下载的,Spring提供了本地文件的xsd文件,这些xsd文件就配置在META-INF/spring.schemas文件中进行配置,由于文件中内容比较多我就不复制出来了。
在Spring进行xml解析之前会创建一个namespace的处理器的解析器:
public NamespaceHandlerResolver getNamespaceHandlerResolver() { if (this.namespaceHandlerResolver == null) { // 创建默认的namespace处理器解析器,加载spring.handlers中配置的处理器 this.namespaceHandlerResolver = createDefaultNamespaceHandlerResolver(); } return this.namespaceHandlerResolver; }这里创建的namespace处理器就是放在META-INF/spring.handlers文件中,比如util标签、context标签的都是在这个文件中配置的处理器,对于util标签的namespace处理器如下:
public class UtilNamespaceHandler extends NamespaceHandlerSupport { private static final String SCOPE_ATTRIBUTE = "scope"; @Override public void init() { // 注册constant标签的解析器 registerBeanDefinitionParser("constant", new ConstantBeanDefinitionParser()); // 注册property-path标签的解析器 registerBeanDefinitionParser("property-path", new PropertyPathBeanDefinitionParser()); // 注册list标签的解析器 registerBeanDefinitionParser("list", new ListBeanDefinitionParser()); // 注册set标签的解析器 registerBeanDefinitionParser("set", new SetBeanDefinitionParser()); // 注册map标签的解析器 registerBeanDefinitionParser("map", new MapBeanDefinitionParser()); // 注册properties标签的解析器 registerBeanDefinitionParser("properties", new PropertiesBeanDefinitionParser()); } // ....省略其他代码 }这些处理器加载完之后就会进行BeanDefinition的解析:
protected void parseBeanDefinitions(Element root, BeanDefinitionParserDelegate delegate) { if (delegate.isDefaultNamespace(root)) { NodeList nl = root.getChildNodes(); for (int i = 0; i < nl.getLength(); i++) { Node node = nl.item(i); if (node instanceof Element) { Element ele = (Element) node; // 如果节点是默认的命名空间则使用默认的解析 if (delegate.isDefaultNamespace(ele)) { parseDefaultElement(ele, delegate); } else { // 定制的namespace标签 delegate.parseCustomElement(ele); } } } } else { delegate.parseCustomElement(root); } } private void parseDefaultElement(Element ele, BeanDefinitionParserDelegate delegate) { // 解析import节点 if (delegate.nodeNameEquals(ele, IMPORT_ELEMENT)) { importBeanDefinitionResource(ele); } // 解析alias 别名节点 else if (delegate.nodeNameEquals(ele, ALIAS_ELEMENT)) { processAliasRegistration(ele); } // 解析bean节点 else if (delegate.nodeNameEquals(ele, BEAN_ELEMENT)) { processBeanDefinition(ele, delegate); } // 解析beans节点 else if (delegate.nodeNameEquals(ele, NESTED_BEANS_ELEMENT)) { // recurse doRegisterBeanDefinitions(ele); } }解析完之后就会调用注册,将解析到的BeanDefinition放在beanDefinitionMap和beanDefinitionNames集合中,最终完成了BeanDefinition的加载过程。
现在开发基本都是使用Spring Boot,是全注解方式,这种BeanDefinition的加载实际上就是指定了一个包的扫描,然后扫描这些包下标记了@Configuration、@Component、@Service、@Controller等注解的类。感兴趣的可以去看下AnnotationConfigApplicationContext这个类是如何扫描的。
这就是Spring BeanFactory的创建过程,并且包括了BeanDefinition的加载过程,接下来我们进行自定义标签,让spring进行解析。

